Maintenance and Repair
How do I change the oil / What is the oil change procedure?
Jeb - Sun Jan 7 07:55:33 2001
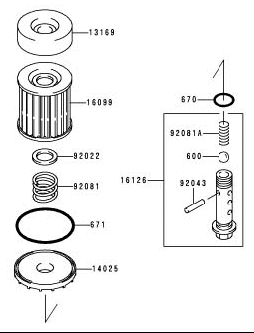
Here is a diagram of the filter assembly (Below):
Warm up the engine. Turn off the engine and let it sit for a few minutes; place the bike on centerstand. Remove the drain plug bolt on the bottom of the engine over a 3+ qt container (don't burn yourself). Once the oil flow has slowed to a drip, replace the bolt and tighten to 14.5 lb/fts (2.0 Kg-m); don't over tighten it unless you really dig oil leaks. Remove the oil filter bolt and filter retainer, just in front of the drain bolt. More oil and a dirty filter element will come out. Be sure to keep all the springs/grommets in order.
Place the new filter (STP SMO-12; SMO-09 will work if you can't find the SMO-12) on the retainer, and replace the assembly, again torquing the bolt to 14.5 ft/lbs (2.0Kg-m). Open the filler cap on the right side of engine. Fill w/ 1.5 qts of your favourite oil. Wait a minute, then add a very small amount of oil at a time until oil is halfway up the level-check window. Replace the filler cap.
Start up the bike for a few minutes, then shut off the engine and wait a few more minutes before checking the window again. Put another few ounces of oil in. Repeat until oil level is consistently in the centre of the view window. Centreline in the window while the bike is on centerstand is the same as full with both wheels on the ground. Do not overfill (you could blow a gasket).
How often should I change the oil? What kind should I use?
Leon - Wed Mar 15 18:09:35 2000
The book calls for 10W40 to 20w50. The consensus here is not to put synthetic in the bike until the break-in period is finished. I have also heard that you shouldn't switch an old high mileage bike to synthetic as some of the crud may be plugging leaks.
Personally I believe that synthetic oil may increase the life of the motor by up to 50%, but the extra cost of using synthetic oil exceeds the cost of replacing the motor. I use synthetic automotive Mobil 1 15W50 or 10W30 because I don't like changing motors. I change both oil and filter every 3000 miles, unless I'm on a trip, then I wait till I get home.
Are there preferred brands of oil for motorcycle use?
Daryl - Thu Nov 9 16:58:20 2000
Oils $5.00 or less that rate above average at a discount price: Belray EXP Blend M/C $4.99, Motulm 3100 Blend M/C $5.00, Golden Spectro Blend M/C $4.95, Mobil 1 Tri-Syn Auto $4.29, Shell Rotella 15w/50 Auto $1.39. Golden Spectro ranks highest in anti-wear additives with Shell Rotella second, the others rated well.
Best in Extended Oil Changes is Moble 1 Tri-Syn, second Motul 3100, others rated well.
Best in Low Mileage Extended Sit Time is Shell Rotella, second Motul 3100, others rated well.
Best in Hot Running Evaporative Losses is Moble 1 Tri-Syn, second Belray EXP, others ratedwell.
Best in Viscosity Retention is Shell Rotella, second Belray EXP, others rated well.
This doesn't include all the data, but most of it. Remember, this list is of oils $5.00 or less; there may be better oils, but you will have to pay $7.95 to $9.95 a quart, and the difference in protection is not that much greater if any at all.
Is synthetic oil really all that great?
Jeb - Sat Apr 1 22:35:19 2000
Synthetic oils have better resistance to thermal breakdown than petroleum-based oils, which is important in small-displacement, high-revving engines like ours; synths work almost as well under high heat as when relatively cool, while fossil oils can turn to goo.
There are more advantages. Synthetic oil has better residual properties; it clings to engine components better than fossil oils (more cohesive), which means cold clutch plates are less likely to stick. Synth oils get to cold engine parts faster than fossil oils, which means less damage at startup. And because of the better synth cohesive properties, those components that don't get fully lubricated during the first few seconds after startup (while pressure is established) will suffer less frictional wear. Synth oils also maintain their viscosity more effectively over time, and under different engine loads. Ultimately, synth oils just lubricate better.
What oil filters are available?
IanJ - Thu Jun 19 17:17:33 2003
You can find the following oil filters, which are a direct replacement for the Kawasaki unit sold by dealers. Most are around half the price of the Kawasaki filter:
Amsoil: SMF 101
CarQuest: CFI-89941
Emgo: 10-37500
Fram: CH6012 of CH6009 (12 is ideal; the 09's o-ring is oversized)
Hastings: LF571
Honda: 15410-426-010 or 15410-300-024
Kawasaki: 16099-003
K&N: KN-401
NAPA: 4941
Perf-Form: J-501
Purolator: ML16812
STP: SMO-12 or SMO-09 (12 is ideal; the 09's o-ring is oversized)
Triumph: 1210031
Yamaha: 36Y-13441-00
At least one of these filters will be available at any reasonable auto parts store, such as AutoZone, Pep Boys, Schucks/Kragen, NAPA, WalMart, etc. If you can't find these brands at your favorite auto parts store, check to see if they have a cross-reference chart for the brand of filters they carry -- most filter manufacturers do. Cross-reference their brand to one of those filters listed above.
How often should I lube the chain; what should I use to do so?
Ninja Grrrl - Tue Dec 7 16:58:02 1999
I clean my chain and sprockets thoroughly with kerosene every 800-1000 miles, and apply chain wax every 300-400 miles.
Chain wax comes in a spray can and is applied with a red tube fitted on the nozzle like WD-40. It is just one method - although a good one - of keeping a chain lubed. The chain should be warm (like after a 10 minute ride) and properly adjusted. Spray the wax on the inside of the bottom run, lubricating the rollers well. NOTE: Watch out you don't pinch your fingers between the chain and rear sprocket! Wipe off the excess then wait about 20 - 30 minutes. This allows the liquid "carrier" of the lubricant to evaporate, leaving the chain "waxed."
Yes, kerosene is flammable, but not nearly as much as gas or other solvents; it's fumes are quite hard to ignite. "Gunk" engine cleaner is similar. As always use caution and you'll be fine.
What are some good chain lubes?
Wolcott - Sat Aug 18 09:02:58 2001
Motorcycle Consumer News just did a full test of a bunch of lubes. Their "best buy" is PJ1 Chain Lube (black). It got 25 points.
Their "recommended" list is: Yamaha Performance, Pro Honda HP Lube, Kawasaki K-Kare Foaming, PJ1 Chain Lube (blue), and Torco Power Slide Titanium. All these scored 21.5 to 23.5 points in their tests for clings, rolling resistances, grit resistance, etc.
How do I measure chain slack?
Jeb - Wed Dec 5 12:16:33 2001
Cut out a piece of cardboard approximately 1" x 4" long. Draw a line on it, and put markers at 0, 30, and 40 mm points. Place the end of the cardboard piece against the bottom of the swingarm, toward the front (above the center of the bottom chain run). Put the bike on its centerstand. Gently tug the chain taut, down and then up, noting the entire amount of slack present. Less than 25 mm is too tight, more than 45 is too loose; 30-40 mm is just fine.
How do I adjust chain tension?
Leon - Wed May 31 18:40:07 2000
Remove the cotter pin from the rear axle. Loosen the nut on the rear axle a couple of turns. Loosen the 17 mm nut that retains the brake calliper arm just a bit. Loosen the two 12 mm lock nuts, one on each side behind the axle. The nuts are actually 8mm nuts, but it takes a 12mm wrench to loosen them. Back the nuts off about 1/2 in (10-15mm). Tighten the chain tension bolt on the left side of the bike until the chain is almost right. Look at the mark on the chain adjuster above the axle.
Adjust the right side so the mark on that side is the same. Recheck the chain slack. Adjust it again if needed. Tighten the locknuts, brake arm nut and axle nut, replace the cotter pin with a new one (they're only 25¢ each) check everything one more time and go ride.
Yes, I know the right way to line up the rear wheel is with a couple of straight edges. But this is about chain tension, wheel alignment is a separate topic.
How do I replace the chain?
Jeb - Tue Mar 19 12:22:18 2002
You don't need any special chain breaking or riveting tools; a dremel with cutting wheel, two 2" cclamp and 2 hammers work just fine.
Use the dremel to carefully trim off the excess linkage from the new chain, if any. Take off the front sprocket cover so you can get a good look at how the new chain should be threaded on. Use the dremel to cut off the old chain; it will help to remove the left exhaust canister if you have one.
Loosen the rear axle, put the bike on centerstand, and kick the wheel forward (after loosening the swingarm adjusters and rear brake torque arm). Put the new chain over both sprockets, and bring the ends together under the top run. Grease and assemble the o-rings and master link.
Hopefully you got a riveting master link, and not a clip-type link; the clip-type is fine, but more likely to fail spontaneously (not likely to fail, just more likely). Both are assembled similarly, using the c-clamps to compress the link and plate. Using one c-clamp per pin, put the flat side of the 'c' against the far pin (the one that's already riveted) and the cupped side of the 'c' over the pin that you're pushing through (so you don't squish it as it gets squeezed out). Tighten each side one turn as a time until you just can't do it anymore more; at this point the clamp turn bars may be bent from the torque (!), and there should be a good mm of pin exposed. Remove the clamps.
If you have a riveting master link, then take the biggest hammer you have, and put it behind the link. Using another hammer, repeatedly hit each pin until it mushrooms out to about the size of the other rivets. it may take a while. If you have a clip-type link, use needle-nose pliers to carefully pop on the clip. Keep some spare clips on you, and check the chain at every gas stop.
Another option is to buy an endless chain (without a master link), and drop the swingarm. If you've had the swingarm off before and are comfortable with the procedure, then this method of replacement may actually save time over the above options.
What replacement chain/sprockets should I consider?
Dweedlebug - Thu Feb 22 08:47:48 2001
As far as the best chains out there, I don't think anything really comes close to the DID ERV2 Gold Xring. It has superior tensile strength and excellent lubrication properties. There is a guy that runs the DID ERV2 on his turbo R1 without any hint of failure. I would think any decent parts supplier, whether locally or on the web, could get you the 520/106 chain you need. I would not trust any other type of brand other than a DID. You may not want to cough up the dosh for the ERV2 as it is not cheap, but I'd take a serious look at what DID has to offer in the rest of their product line-up before I made any decisions.
As far as rear sprockets go, lower weight is indeed a benefit; the looks are subjective. If you do go with an alloy sprocket, make sure that it is hardened. I don't know for sure what processes they use to harden them (hard anodization, cyro, ??), but I take it on reliable advice that the hardened ones have much better wear properties than the unhardened. There are a lot of people that have run both hardened and unhardened rear sprockets and the hardened ones always last much longer.
My preference is for AFAM sprockets, as I have never heard a bad word in regards to their products, ever. They sell a hardened rear sprocket, but the looks of it are an individual thing; it only comes in a dull grey finish, but I'll take performance over looks any day of the week.
Second on my list of sprocket manufacturers is Renthal, a lot of European riders like this brand as it is readily available to them, but I have heard a few (like 2 or 3 in the past 3 yrs) complaints that the tolerances were off. I'm not sure if they offer hardened sprockets, but assume they do.
Third is Sprocket Specialists sprockets. In the past year alone, I have heard multiple complaints regarding tolerances and the sprocket as a whole being out of round (was not flat). They offer a lightened rear sprocket that many people swear by, and as I have no personal experience I am no authority, but it sounds like a crap shoot to me and I ain't no gambler.
If you wanna get really flashy, look at what ProTek sells. Bright dip anodized, lightened rear sprockets. I have no info on anyone that has ever used these, but they are the looks (if that is what you are after). Check out the bar ends they offer, too; nice stuff, eh? Their billet ones make any of the other aftermarket bar ends look like crap, in my opinion.
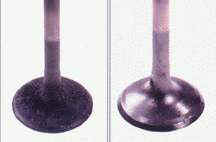
How do I adjust the valves?
Why do the valves need to be adjusted?
VD - Sun Jun 15 02:22:58 2003
The valve clearances determine, to a degree, when the valves open and close, how long they stay open and how far they open. Your engine "breathes" through the valves, as these are the openings that allow the air/fuel mixture from the carburettor (intake valve) into the combustion chamber and for the piston to expel what's left after that combustion takes place (exhaust valves) out through the exhaust pipe, to make room for the next fresh charge of air/fuel mixture.
Technical crap aside, the most important reason on the 250 is that the parts inside the combustion chamber (valve heads and or valve seats on the cylinder head) wear at a faster rate than the parts under the valve cover (valve nibs, rocker arm pads, cam lobes, tappet screws). Wow, that sounds like more technical crap. Translation, the valve clearances get tighter (on the 250) as you rack up the miles, and if they get so tight that there's zero clearance, they'll melt. They valves need to fully contact the valve seats to get rid of some of the intense heat (through conduction) that builds up in them or they're toast. Many engines are just the opposite, in the fact that clearances get looser and start to make more noise, because the parts I listed above are reversed as far as wear rates are concerned.
What is the adjustment procedure?
Jeb - Sun Apr 22 21:53:40 2001
Put the bike on centerstand. Take off the lower and upper fairing, side covers, and fuel tank. Carefully pull the spark plug wires by their boots, and remove the left and right coil packs (two 12mm bolts each). The service manual suggests draining the coolant so the radiator can be removed to make it easier to reach the exhaust valves, but it is possible to avoid this. I also remove the 'wings' from which the front of the engine is hung (one long 14 mm bolt), which makes it much easier to reach the exhaust valves.
Remove the alternator cover and flywheel view cap on the left engine side cover (use a very large flathead screwdriver). Take off the four valve cover bolts and lift the valve cover (do not remove the cover gasket; leave it on the top end). Using a torque lever (large socket driver), turn the engine using the alternator bolt inside the left cover housing; turn the bar forward (counter-clockwise) until the cam lobes over the left cylinder cam lobes point out and slightly up (they should mirror each other, like this). When this is done this correctly, a "1T" mark will be visible on the flywheel through the view hole (you'll need a flashlight to see it), and the tappets below the cams will wiggle when you try to move them under your finger.
Here is a photo of the engine at TDC for cylinder 1
Now take out your feeler gauges, and slide the proper gauge finger under the first cam (of four for that cylinder), between the cam lobe and the top of the valve tappet; it should slide in with little effort, and drag slightly when the clearance it correct. If the clearance is not correct, grab a 9mm socket and loosen the tappet locknut; there's a small screw on top of the nut. Use a very small flathead screwdriver to turn the screw out a bit until the clearance is correct (if you use the looser end of the acceptable adjustment range, it will take longer before the valves need adjustment again).
Rotate the engine again until the right cylinder cam lobes are in the proper position (a "2T" mark will be viewable on the flywheel), and repeat the check/adjustment process. If the exhaust valves need to be adjusted, you may need to remove the radiator retaining (four 10 mm) bolts to move it out of the way (the coolant hoses will keep the radiator loosely attached to the bike); the exhaust valves tend to take longer to work on.
Wipe the valve cover gasket clean of oil and put everything back together carefully when done. Use very little torque on the valve cover bolts; the book calls for 87 in/lbs (if you don't have a torque wrench, then tighten them by hand followed by a 1/8 turn with a 10 mm wrench to seat them).
What are the acceptable clearance ranges?
Paul 311 - Sun Mar 5 17:05:48 2000
.08mm - .13mm for the intake valve clearance .11mm - .16mm for the exhaust valve clearance I think somewhere else in the manual it says that the intakes are 0.10mm and exhaust 0.13mm. Anything in the range listed is probably okay, but I always make sure mine are set to a consistent number. The valve clearances are the same for all 250 Ninja's and ZZR's.
Are there any advantages to selecting a specific setting within that range?
Lou - Sat Mar 25 02:31:12 2000
The valve clearances affect valve timing and overlap (the period that both intake and exhaust valves are open). With everything stock on the bike, the maximum amount of air gets trapped in the cylinder at about 9 grand (peak torque). Before 9 grand, the overlap actually lets a little air go backwards through the intake valve before it closes, reducing the amount for combustion. After 9 grand, the valves are opening and closing too fast, so less air goes in per cycle. One way to shift this slightly is with the valve clearance. If the clearance is at the minimum, the overlap will be more, and the valves will open more. This shifts peak torque (and therefore peak horsepower) up slightly, at the cost of low to midrange performance.
If the clearance is at the maximum, the overlap is less, so it will trap the most air in the cylinder at a lower rpm, boosting the low to midrange, but at the cost of the higher rpms (because the valves aren't opening as far). Having the valve clearance at its maximum also allows the valves to stay in contact with the valve seat longer (transferring heat during that time), and help to prevent burning an exhaust valve. It will idle smoother, because there is less overlap that allows exhaust gases to go into the intake, and lean out the mixture for the next cycle. This is why an engine with cams that put peak torque at 9000 won't idle smooth at 500 rpm.
The exhaust system used also plays into this, because it determines the amount of time the exhaust valve can be open before the gases start flowing backwards. If you change the exhaust, it changes the rpm at which gases will reverse, and let exhaust gases back into the cylinder. AR (anti-reversion) exhaust systems are supposed to give the broadest range of power, because the can prevent reverse flow at a lower rpm. Anyway, tighter clearances will increase top-end power, and the chance of burning valves, reduce low-end power, and adversely affect idling.
Looser clearances will make it idle better, increase low to mid power, and help to prevent burnt valves, at the cost of top end power. Of course if you go too loose then you will have a lot of valve train noise. You can always try both extremes and see which works best for the kind of riding you do, and the exhaust system you have.
What happens if the clearances are too tight/loose?
Lou - Sat Mar 25 02:31:12 2000
Generally running them too tight will increase top-end power for a while until the valves overheat. Then the valve and seat will erode, allow the valve to start to tulip, which will close the clearance even more.
Running them toward the loose end of their tolerance will normally increase low-end power (at the cost of top end), make the valve train noise louder. One of the most important things (aside from staying within the tolerances) is to set all the intake valves clearances as close as possible to one another, and do the same of exhaust. This, just like synchronizing carbs, has a big effect on how smooth the engine runs, especially at low speeds.
Without going into great detail, this is because the carb sync only determines that the intake valves have the same pressure upstream, but the timing point at which the valve opens and closes determines how much of that air will get into the cylinder. These combined ensure each cylinder is doing equal work, and therefore run smoother and more efficiently.
My recommendation to those that are mechanically inclined is to learn how to do this yourself, because nobody will pay attention to detail (or be more concerned about scratching your bike) than you. If you have a friend that knows how to do this, seek help for the first time (preferably have him demonstrate on his own bike first, and see if it still runs afterwards).
After valve adjustment, resync the carbs, because if the valves weren't set correctly then the airflow may change slightly, requiring the carbs to be rebalanced.
Do I really need to adjust the valves every 6000 miles?
Leon - Wed Jul 12 13:34:34 2000
If you're taking it easy with the bike, I wouldn't think that the extra miles will make much of a difference. I try to adjust the valves every 10,000 miles but do so more often if I've been riding faster than normal. I would guess that fewer than half of the Ninja 250s sold ever get their valves adjusted. I never did mine until I discovered how much of a difference it made in the way the bike performed.
With the valves set wrong, the bike runs just fine in most cases, with them right it runs noticeably better. There are probably several other adjustments the bike could use that I just don't know about.
The valves are also rather intimidating to the novice user. They need to be adjusted within a couple thousandths of an inch or else the bike won't run at all, measurements of that accuracy are not normally done by the average person.
What is the "hot soak" valve cleaning method?
Jeb - Wed Jul 23 01 12:15:37 2001
Over time, carbon deposits and varnish can build up on the valves, piston crowns and intake tract. These deposits are usually greater when the bike is frequently used to make short trips, as the engine does not reach full operating temperature. Frequent idling and low-rpm riding, especially when the engine or ambient temperature is cold, can also contribute to advanced carbon build-up.
Some carbon on the valves is not harmful, but as the deposits accumulate they can cause poor performance. Valve surface area increases, creating turbulence and disallowing complete intake and exhaust of fuel mists, causing incomplete combustion and further deposits. Eventually, valves may stick, or the sharp edges or hardened deposits may cause hot spots and damaging preignition.
Rather than waiting for an engine rebuild to clean the valves, a simple treatment process can be used every 15000 miles or so to keep the system relatively clean. Basically, a valve cleaning solution is fed directly into the intake manifold of a hot, running engine; this "hot soak" quickly breaks up deposits.
For this job, a 3" length of 1/4" I.D. clear tubing, a 1/4" O.D. T-fitting, and a bottle of valve cleaner are needed. Cut a few pieces of the tubing off, and use the T-fitting to make a configuration like this.
After warming up the bike, kill the engine and pull the intake manifold vacuum hoses, then connect the T hoses to the nozzles. Put the other end of the hose into the bottle of cleaner, and use a small vise-grip or clamp to close it. Start the engine, and turn up the idle to 2K RPM. Slowly release clamp pressure, so that the cleaner is drawn up into the engine; do not let too much be taken in at once, or the engine will stall. It is normal to see a white smoke exiting the exhaust pipe.
After several minutes, the engine will start to labor as the carb bowls become empty. For a longer interval, the free hose connected to the tank petcock can be reattached to one of the intake nozzles to refill the bowls. When the intended treatment time has been reached, open the clamp so that the cleaner stalls the engine; do not start the engine again for several hours.
Reconnect the carb hoses and pour the remainder of the cleaner into the fuel tank, if desired. When next starting the bike, the engine may cough and sputter a bit, as well as belch out some nasty stuff from the tail pipe; this is to be expected. Go for a ride, and fully warm the engine up, then change the oil. Smoother idling and better efficiency may be noted thereafter.
How do I change the spark plugs?
Jeb - Sun Jan 7 13:39:58 2001
Spark plugs are recessed into the top of the engine. The owner's manual suggests they can be changed w/o removing the gas tank, but if you've never done this before, I think it's easier to remove it first.
Remove the seat, and remove the two bolts holding the back of the tank to the frame under where the front of the seat attaches. Also, there is a bolt on each side of the gas tank that holds it to the upper fairing; these must be removed as well to get the tank off. It should not be necessary to remove the fairing. Pull the fuel and vacuum hoses off the petcock, and slide the tank rearward and up.
Now you see the top of the engine. Gently remove the two ignitions wires by the boots where they attach to the plugs. Then take your handy spark plug wrench that came with your bike's toolkit, and remove the old plugs.
Examine the plugs. See of they are dark, white, bent, oily... plug condition can point to engine problems. Installation is reverse of removal; apply very little torque to the plugs with your wrench. Permatex anti-seize is recommended to protect the plug threads.
NOTE: use only the recommend spark plugs. There have been accounts of plug failure, including detonation, when using Champion or Autolite replacements.
How do I service the brakes / How do I bleed the brake lines?
Steve - Fri Oct 22 03:14:25 1999
Ok, first you need 3 tools: phillips screwdriver, cresent wrench to fit the bleeder screw on the caliper, about 18" of clear tubing that fits tightly over the bleeder Grab some good, clean brake fluid and a bottle of Coke, Dew, etc. while you're out.
First, clean the master cylinder, caliper, bike, and maybe the garage while drinking the Coke. When done with the bottle, clean it out and fill it about halfway with brake fluid then drop the end of the tubing into it. Now remove the cap on the master cyl. and top off the fluid. Put towels, rags, etc. under/around/near anywhere the brake fluid could possibly go if it leaves the master cyl. at high speed (and it will!). Now CAREFULLY squeeze the brake lever and open the bleeder screw. Pump the lever a few million times while keeping the reservoir full. Eventually there will be no bubbles coming out of the hose in the bottle of brake fluid. Squeeze the lever one more time, hold it back, and close the bleeder screw. All done.
Bleeding brakes is annoying, but necessary. We generally depend on ONE brake to stop us. Cars have 4 and can afford to lose half of the braking power and still slow down enough to stay mostly out of trouble. We're screwed if we lose any power ;)
How do I change the brake fluid?
Jeb - Wed Mar 22 12:44:54 2000
Okay, this is not hard, but it can take a long time; set aside an hour if you plan on doing front and rear. You need to change the brake fluid every two or three years, or when you want to bleed the brakes but don't know what kind of fluid is presently in use (you should bleed the brakes whenever they start to feel weak or soft). I used:
12 oz. bottle of DOT4 brake fluid (new)
3 ft of clear, 3/8" vinyl hose
small toolkit cresent wrench
small toolkit phillips-head screw driver
sealable plastic container (I used an empty milk chug bottle)
a few old rags
Put the bike on centerstand, attach the hose to the front bleeder valve, and run the length of hose into the empty bottle. Carefully open the valve with the wrench, and repeatedly squeeze the brake lever until no more fluid comes out. Close the valve.
Now comes the lengthy and frustrating part- new fluid has to be poured into the master cylinder reservoir, and pumped back into the brake line. Two things make this a pain: there is no pressure in the line any more, so it takes twice as long to put the fluid back in as it did to pump it out; also, you must constantly monitor the reservoir level, and not let it empty, all the while avoiding any spillage (brake juice is corrosive), and quickly wiping/washing any surfaces/hands that are contaminated (don't let fluid contact the brake disc or pads!).
Open the reservoir cap, and remove secondary cap and rubber seal; fill with the reservoir with fluid. to fill the brake line, you must repeat the following sequence at least 20-30 times:
open the bleeder valve
squeeze the brake lever
close the bleeder valve
release the brake lever
This process allows the fluid to enter the line, but not let the vacuum retract it again. Slowly line pressure is re-established, and eventually the fluid will begin to exit the valve again.
Now you can do what you ultimately wanted to do in the first place - bleed the line - this isn't hard at all. With the valve closed, pump the brake to establish pressure, then quickly open and close the valve to bleed it; repeat. You basically just keep feeding fluid through the line until no air bubbles are seen exiting the line with it anymore.
Tightly seal the reservoir cap and bleeder valve to deter air entry. Repeat above for rear brake (my rear brake took half the time of the front). You should notice improved lever/pedal feel, and your stopping distances should decrease as well.
How do I replace the brake pads?
Jeb - Wed Aug 16 21:21:25 2000
This is a pretty straightforward job, but you need to be careful with the brake caliper. Do not drop the caliper, suspend the caliper from the brake line, put your fingers between the caliper, or apply the brake with the caliper removed.
Remove the two bolts holding the caliper to the bike, and remove the caliper. Use a C-clamp to compress the pistons. If you don't have a clamp you can use a small wrench, wrap a cloth around it, and insert it into the caliper between the two used pads; gently apply pressure down toward the two pistons, prying the caliper apart. Now you to easily remove the used pads, and fit it back onto the brake rotor back with the new pads in place.
Turn the caliper upside down. The small pad will probably fall right out; the larger pad you may have to work off the retaining posts, as there is little room between the ends of those posts and the caliper 'claw.'
Installation is a snap. Put the large pad on the retaining posts, then place the small pad against the pistons and nestle it into the defined spot. Slide the caliper back onto the disc, and line up the bolts to the caliper holes. The bolts don't need much torque to seat them.
What replacement pads should I consider?
Jim Race - Wed Mar 7 02:33:23 2001
The stock pads aren't too bad, Until they become bad. They tend to fade really fast. Don't race on them, if you can help it. Galfer greens are nice, and a good excursion into improved braking. I found they were very "progressive" in that increased level pressure was very measured in the way the brakes grabbed.
EBC HH's are braking overkill. Grab a handful and you have a handful. I like to brake really, really late so for me the HH's were a good fit. YMMV.
I've never used a Ferodo on my EX, but I had a set on my RZ350 and was quite pleased with them. If the HH acquisition situation heads the way of the Dunlop K591 rare species, I'd say go with the Galfers. At the very least it seems that there is always a Galfer dealer at every race. I like working with dealers that provide that kind of support.
What other components should I check?
Lou - Wed Mar 22 23:14:31 2000
When changing the brake fluid, the book says you should also replace the master cylinder and caliper dust covers/seals. If you replace these items before they crack and let moisture in, it can save you big trouble later caused by water corroding the callipers and pistons.
If you put a light coat of grease (compatible with the seals) between the seals and the dust covers it will prevent water from getting in during rainy day rides or washes (unless you use a high pressure sprayer, in which case, never mind). This is something that can be done the first time you replace the pads, while you are inspecting the dust covers for damage.
How do I service the carbs & filters / What carb components do I need to check?
Paul 311 - Sun Jan 23 22:33:21 2000
The carbs on the Ninja or ZZR are really simple things, and should never need to be completely replaced. There are a few components which may wear out though. The float valves are these little spring loaded aluminium parts with a little rubber nub at the end. There is a float attached to this valve that pushes it up and closes it when the float bowl has enough fuel. These little tiny parts cost about $25 each, so your best bet is to remove them clean them and re-install them if you think they are the source of the problem. Another problem Ninja carbs tend to have is that the rubber O-ring that seals up the float bowl will get dry and shrink and suddenly you will find that it looks like gas is raining down from your carbs onto your starter.
The third fuel problem Ninja and ZZR owners are likely to have is when the vacuum operated petcock fails. The vacuum petcock keeps fuel from flowing out of the tank unless the bike is drawing a vacuum. This keeps the bike from flooding itself when parked. The needle valves should also keep this from happening, but don't always do their job.
How do I remove the carbs to work on them?
Duke - Tue Aug 29 22:33:47 2000
The carbs are a little difficult to get out if you have the stock airbox. After doing this about 10 times, I think I've found about the easiest method.
You have to loosen the rear fender/battery holder and move the whole thing back about an inch to get the carbs out. There are two bolts directly in front of the back wheel that hold the fender on.
You'll need a really long socket extension to get them out. Remove those two bolts on the lower part of the rear fender, as well as the two fender bolts just under the seat, and the two bolts under the battery. That allows the airbox/fender to move back just enough to get the carbs out without bending any of the rubber parts too severely.
However, I believe the last time I had the carbs out, I did it without moving the rear fender. You just have to get somewhat forceful with the rubber boots. If you push the rear ones into the airbox, it can be done by forcing one of the front boots off, and the other one slips right off. Remember this procedure for re-installing them.
How do I adjust the bowl floats?
Wes - Sun Jul 2 08:10:30 2000
Fuel Level: 0.5 +/- 1.0 mm above the bottom edge of carburettor body Float Height: 17mm
Drain the fuel out of the carburettors into a suitable container.
Remove the float bowl by taking out the screws with lockwashers.
Slide out the pivot pin and remove the float
Bend the tang on the float arm very slightly to change the float height. Increasing the float height lowers the fuel level and decreasing the float height raises the fuel level.
Assemble the carburettor, and recheck the fuel level.
If the fuel level cannot be adjusted by this method, the float or the float valve is damaged.
How do I clean the carb parts?
Duke - Tue Aug 29 22:33:47 2000
Crash course in carb cleaning: Take off carbs. Take apart. Spray carb cleaner inside. Put back together.
Okay, now for the long version: Once you have the carbs out of the bike, turn them upside-down and remove the phillips head screws and take off the float bowls. Inside are two 'floats' each connected to a 'float valve' that allows fuel into the float bowl. When full, the float valve shuts off the fuel supply just like the float in a toilet tank. With some needle nose pliers, gently pull the pin out that holds in the floats, and remove along with the float valve plugs.
Now remove the tops of each carb and carefully remove the slides/jet needles. Be very careful with the rubber diaphragms which are very fragile. Once everything is apart, use a can of carb cleaner spray (available at any Wal-Mart, K-Mart, etc; I think I used the B-26 Chemtool last time) to thoroughly clean the inside of the carbs. Be sure you get the can with the little tube on the nozzle so you can spray it in all the little spots in your carbs. Spray cleaner through every jet you can possibly find. Be careful you don't get the cleaner on any plastic parts on your workbench; it will melt them (I learned the hard way - sorry dad). Do not use any sharp objects when cleaning carbs; the pressurized spray works fine. Also, you can clean the tips of the float valve plugs by rubbing against a piece of cloth. The tip is rubber, inspect for damage.
Once clean, inspect everything and put it all back together. You can get the carbs and carb boots back on in the opposite order you removed them. Poof! Instant clean carbs, except that it will actually take you 3-4 hours to do it right.
How do I get the vacuum pistons back in correctly?
Jeb - Mon Oct 2 13:19:16 2000
After pulling and disassembling my carbs probably 10 times, the diaphragms of my carbs' jet needle vacuum pistons have started to become a little misshapen. Not a big deal, but reseating them has become more of chore each time.
This time I thought I had them seated adequately, but when I went for a ride that night, I found that the throttle input wasn't lifting the guides as much as it should have been, so the needles weren't rising out of the jets enough and I was running lean and sluggish.
I pulled the carbs again today, and sure enough, the diaphragms were kinked and out of round under the top boots. After another several attempts to get them back in properly, I gave up and tried to figure out what to with them. I wasn't about to replace them; they were still in decent shape and usable (plus new ones are very expensive), but I couldn't get them back inside the carbs!
Then I remembered something I read several months ago, about getting them cold so they would shrink enough to be put in correctly. So I put mine in the freezer for an hour, and sure enough they did shrink a little and stiffen up enough for me to get the rubber rims lined up with the groove on the carb body; if I'd left them in another hour it would have been even easier, I imagine.
So if you ever have trouble getting your slides back in, try putting them on ice for a bit. My bike is running fine now.
How do I clean the air filter(s)?
Daryl - Thu Jan 11 19:09:11 2001
I use a little bit of Tide powder detergent and water, and mix it up in a pan. Let the filter sit in it for 10 to 15 minutes, and then run the filter up and down in the mixture a few times. Use a water hose to rinse the filter thoroughly from the inside out. I use a hairdryer to dry the filter, then use K&N Spray oil to lightly and evenly oil it. I've used this method on two filters with over 130,000 miles on them with good results. I clean filters about every 15-20,000 miles. Tide's good for your cotton shirts and ok for your cotton filters!
How do I install a fuel filter?
Jeb - Wed Aug 30 22:12:55 2000
Go to any auto parts store and get a Purolator filter model F-10024; it's a brass filter that is small enough to fit between the tank and carbs, and costs about $3. There is also another similar Purolator filter that is transparent and accepts replicable elements, but I do not know the model number.
Dennis Kirk sells some smaller, see-through filters for $2 each (part number 18-515); a local small engine shop might also carry these
Turn the fuel petcock to off, then pull the tank-side of the fuel line and empty the hose. Reattach it and cut the hose about halfway between the carbs and tank. You will have to trim a bit of hose to fit the filter in there, but it should fit snugly with about 1 or 2 cm cut from each side. Be sure to attach the filter so that the arrow on it points toward the carbs (if you can't find an arrow, the side with the larger diameter goes toward the carbs). You should check the filter every 3k miles for need of replacement.
Note: Post-2000 models have an inline filter stock, at the very end of the fuel line going to the carbs. It is very small, however, and could still be assisted by a replicable aftermarket filter (though it's certainly better than nothing alone).
How does weather affect jetting?
Here's the skinny on weather:
Cold air is more dense (less activity w/ the molecules, thus they're closer together)
Hot air is less dense (More activity between molecules)
Moist air is lese dense (more H2O molecules between the O2 molecules)
Dry air is more dense (more O2 per volume of air)
So... dry cool air is more dense, moist warm air is less dense.
Your carburettors mix a certain amount of fuel with a certain volume of air. There is an ideal ratio of fuel to air called the stoichiometric ratio, which is about 14.7:1. At this ratio, theoretically, all of the fuel will be burned using all of the oxygen in the air. In reality (your bike/my bike), the fuel to air ratio varies from 14.7:1 quite a bit. More air = less gas (lean); more gas = less air (rich).
Your job when jetting your bike is to get as close to this ideal 14.7:1 ratio as possible, (which also produces the most power). The problem is denser air (Cold/Dry) produces a leaner condition and thinner air (hot/wet) produces a richer condition. The other problem is that the weather is constantly changing. So in the end, yes you can constantly chase the perfect mixture (thus the advantage of fuel injection which is constantly adjusting for weather) or you compromise and set up the jetting to work well at about 70 degrees... a happy medium.
A lean condition can hurt your engine over time, but you would certainly know it's lean (spitting, sputtering, etc.). I ran 92 mains in my carbs for a long time and had no problems until I pulled my airbox top (allowing more air to flow - thus creating a leaner condition) and I could immediately tell it was too lean. 105's (stock) are in it now and it runs very well. Why did I pull my airbox lid? Why do people use K&N pods? More air in = more O2 in = more gas in = more power.
How do I check and or change coolant / How do I check the coolant level?
Thundercat - Wed Dec 8 16:41:23 1999
Your coolant tank will have two marks on it - a low or cold level, and a high or hot level. When the bike is cold (has not been run) the coolant level should be no lower than the low/cold level. When the bike is hot (just been shut off after a significant ride) the coolant level should be no higher than the high/hot level. This is a normal operating range - coolant level will fluctuate as it expands/contracts. If you need to add coolant, add a 50/50 mixture. Never use any coolant other than one specified for motorcycles!!! Other coolants may have abrasives in them that clean other systems, but will damage a motorcycle system.
Fluid levels should always be checked with the bike straight up, resting on its tires unless the manual states to do so on the centerstand. The slight elevation a centerstand or swingarm stand gives may give you an erroneous reading. When in doubt, follow the manual, then check the other way to see if there's any difference.
How do I change the coolant?
Patrik - Mon May 15 23:02:47 2000
There are 2 coolant drain plugs. First open the filler cap, then remove the first one. It's on the water pump, it's a 10mm bolt (as opposed to the 8mm mounting bolts). Watch it, the water comes out with quite a bit of pressure; it goes straight out the side. Then drain the coolant in the cylinder; the plug is on the front, between and slightly under the pipes. The expansion tank is probably most easily drained by taking it off and pouring it out the cap. If you want to be sure to get all coolant out, you should probably flush once with water as well.
You can't fill it at the expansion tank. Just fill at the filler cap at the radiator, and when it's full start the bike and let the engine idle; this will make the air bubbles come out and you can fill more. When the water starts getting hot and you can rev the engine without having bubbles come out you're set. put the filler cap back on.
How do I work on the suspension / How do I remove the fork pistons?
Gazoo - Wed Aug 30 17:42:27 2000
1. Go out and buy a gear-puller (Sears has them for about $30). If you're on a budget you might also try a battery terminal puller from Autozone for $3.
2. Jack up the front of the bike so you don't have to worry about the front forks collapsing while your taking the springs out.
3. Remove the handlebars by unscrewing the four hex-head bolts on top of the upper fork holder.
4. The fork springs are held inside the forks by a piston (that thing with a dimple in the top) which is secured by a snap ring. Use the gear-puller to push the piston down so you can pop the snap ring out with a pair of pliers.
5. Once the snap ring is out you can loosen the gear-puller - but not too fast! The piston will rise very slowly because its in there tight, but once it reaches the top it will want to shoot out like a champaign cork. Just in case, don't put your face over the fork tube while doing this. Let the gear-puller slowly ease the piston out.
6. Underneath the piston are some miscellaneous hardware like a large washer and a spacer. The spring should be visible once the hardware is out. Replace it and assemble in reverse order.
How do I replace the fork seals?
Brent - Tue May 28 18:09:36 2002
Disassembly:
Remove the top plug and fluid from the forks before removing them from the bike. Once the forks are removed, take the allen bolt out of the bottom of the tube. Be careful not to strip this bolt as it is very tight!! There should be a copper washer/seal with this bolt. (You may need to stick a wooden/dowel or handle down the tube to hold the inner part of the fork from moving... I did it without this).
After removing the allen bolt, the inner fork assembly will slide out (rod thingy & spring). Remove the rubber dust cover from the top of the black portion of the tube using a small screwdriver. Remove the clip above the fork seal using a screwdriver.
Now you need to pull the tube out of the shock. Hold onto the silver tube part with the black shock part facing down and pull up and down with a rapid jerking motion. The black portion of the shock should move freely up and down with each jerk. Keep doing this until the black shock portion falls to the floor. (May wanna put a towel down to protect it when it falls.) The small tube that completes the rest of the inner shock should now be free inside the black shock portion.
After the removing the silver tube, the fork seal should now be on it. Remove it by hand and clean everything up using a lint-free towel. Check the fork tube and guide bushings for damage/scratches. If there are any scratches or nicks on the fork tube, sand them smooth with very fine grit sandpaper (1500+ grit). Sand in an up and down motion. If there are major gashes in the tubes or the bushings look damaged, replace them. Installation:
Drop the lower portion of the inner shock assembly (small 1.5" aluminum tube) into the shock with the flat part facing down. Place the silver tube back into the fork. Slide the bushing down the silver tube and align the notch facing toward the right or left side. It is important not to face the notch to the front or rear as this will cause premature wear to the fork tubes upon sudden stopping or acceleration.
Drive the bushing into the fork using the PVC pipe. Apply oil to the new seal and slide it down the silver tube with the spring facing up! Slide the old seal down on top of the new seal and use it as a cushion to protect the new seal when you use the PVC pipe to press the new seal into the shock. Slide the old seal off and install the retaining clip and the dust cover.
Slide the inner fork tube components back into the tube. Spring and larger rod (golf-tee thingy). Screw the allen bolt back into the bottom of the tube. *Apply some silicon sealant to the copper washer to help seal it* Tighten the allen bolt to the proper torque. (Again, you may need to hold the inner fork tube using a wooden dowel or the proper tool from Kawi.) Once you have tightened up the bolt, slide the silver tube up and down. It should bottom out when pressing it all the way in and it should hit the spring when pulling it out. If it doesn't, something is assembled wrong.
If everything slides smoothly, reinstall the forks, fill them with the appropriate amount of fluid, drop the springs in and cap em off. Put your bike back together and ride away happy.
How do I service electrical components / How do I replace the headlight?
Leon - Thu Jul 13 18:54:40 2000
Pull the wiring plug off first, then the dust cover, the bulb is held in place with a little wire retainer. The bulb pulls straight out the back once the retainer is loose. It is much easier to do all this with the whole assembly removed from the bike. I think the factory puts some extra paint or other goop to keep the light glare from escaping back into the fairing. With the fairing off, you should be able to see where some of that got scraped off. Some more rubbery black paint should stop that extra light from escaping.
How do I adjust the headlight beam?
Vernon Dozier - Sat Jul 27 20:48:39 2002
Look at the back of the headlight. See the white plastic pieces in the upper right hand and lower left hand corners? Those are the guides to adjust your headlight aim. The vertical adjuster is the one on the lower left corner and the horizontal is the other. Stick a phillips screwdriver in the guide from the bottom and turn the screw that can't be seen. You're turning a screw, not trying to pry the guides off. Those plastic pieces are just guides for the screwdriver.
What kind of battery should I use?
Jeb - Tue Dec 18 18:45:14 2001
After over 3 years and 27,000 miles of service, my stock Yuasa YTX7L-BS finally stopped retaining a consistent charge. I could ride around all day on it, but if it was parked for more than a few days, it was dead.
Instead of spending $70 on a new one, I decided to go to Wal-Mart and sears and try to find some suitable replacement. Wal-Mart carries a fine substitute for the '88-'94 stock battery (Yuasa YB9L-A2), which is about $20. They do not carry a comparable part for the '95+ model, however (the '88-'94 battery will fit the '95+ bikes, but it is larger and heavier).
Sears has a good one, though: part 28-44353. It's a bit smaller in size than the stock '95+ battery, and it's a wet-type unit (not maintenance free, like the stock one). Benefits? Well, for starters it's $17 - very cheap. It has a 5 amp/hour rating ('95+ has 6 Ah, '88-'94 has 9 Ah), a 90 CCA rating (vs 85, 124), and it's smaller and lighter than the other two.
Actually, this could be a good replacement for any year Ninja battery; it would have to be 'shimmed' if used in a '88-'94 model, though. It has a shorter standby time, but a comparable amount of cold cranking amps to the others.
After almost a year of use, I can report that the new battery works just fine.
How do I work on clutch components / How do I lube the clutch cable?
Jeb - Sun Jan 7 07:55:33 2001
Remove the bolts holding the clutch lever/cable to the handlebar. Remove lever-end of cable, so that you can hold the little knob on the end of the cable between your fingers. Grab a can of WD-40, and a can of 3-in-1 oil. Take the WD-40 and spray a nice bit off it down the cable line; you'll see a few drops exiting the clutch-end when you've given it enough. Now squirt a little 3-in-1 oil into the same place you just doused w/ WD-40. Work the cable in and out of the sheath several times; squirt more oil in there, repeat. Do this about 10 times. Your clutch cable is now lubed; it should not need another treatment for many months. A well-lubed cable should last 15k miles or more.
How do I replace the clutch cable?
Leon - Sat Mar 25 17:18:53 2000
The first difficult item is threading the new cable into place where the old one was. I find this easiest to do if I put the new one in place as I remove the old one. It also helps to remove the seat and fuel tank to see where it goes.
The other difficult part is adjusting the free play. I usually adjust it at the handlebars so it's about in the middle of it's adjustment, then use the two nuts down near the engine to set the initial free play. That way there is plenty of movement in either direction at the handlebar end for later adjustment.
How do I refurbish a slipping clutch?
Leon - Fri Jul 5 09:51:12 2002
The consensus here is the springs go first. If it's a high mileage bike, the fingers on the basket might have some grooves worn in them. Remove the clutch cover and see what's wrong (have a new gasket on hand before doing this). The manual has service lengths for the springs and thicknesses for the plates. If it's the springs, replace them. If it's the basket, file it smooth (take it out of the bike when you do this, you don't want the aluminum filings in the motor).
It's probably not the clutch plates or steel plates; these should last as long as the engine if not abused.
How should I clean the bike?
Ninja Grrrl - Tue Dec 7 08:40:03 1999
You can easily clean you bike with a garden hose, just make sure you don't use too much pressure. Don't be afraid to wet it down good, just don't concentrate the spray on the switches, wiring or airbox.
Hose it all down, then with a clean mit, wash it from the top down with car wash detergent. Never use dishwashing liquid or any other detergent formulated to cut grease - it will cause deterioration of the natural oils found in your tires, hoses and seals, causing them to become brittle and wear out faster. For dirtier areas like wheels, chain guard, swing arm, kick stand, etc., use an older wash mit (using your good one might contaminate it with grit). Rinse the bike thoroughly and dry it with a chamois (real or synthetic). It doesn't hurt to run the bike for a few minutes either to better dry it out.
A good coat of wax will help protect the painted surfaces as well as the polished, chromed and glass. I also wax the windscreen, but don't wax any textured plastic like the mirrors or rear fender - it's hard to remove. I use Eagle One wax; be careful, some waxes may be too abrasive. There are a lot of specific cleaners out there - some good, some bad and some hazardous. Try them with caution, they may damage finishes or penetrate into seals where you don't want them.
How often should I replace the tires?
Leon - Wed Jun 7 19:07:04 2000
It depends on how hard you ride. I've heard that some of the racers replace tires after only a several hundred miles. Most of the sporty street riders replace tires in the low thousands of miles. Old guys with touring tires can sometimes go farther than that on a set of tires; I've got 27,000 on the Metzler
ME33 and ME88 on my bike now. I think it's a good idea to replace any tires older than two years; rubber deteriorates over time.
What do I need to know when looking for replacement tires / What tire makes are available that fit the 250?
Avon Super Venom (Gammagirl - Sat Aug 26 14:30:11 2000): The Avon Super Venom is still available in 130/90 and 100/90 for the 16" tire. These tires stick to the road and are also relatively inexpensive (and in my opinion outperform and outlast Metzlers and K591's); they are very popular with European racers! My ex-husband races them at Mosport in Ontario on his TZ250. I had them on my RG500 Gamma and the bike held the road like a fly on flypaper, while lasting over 20,000 KM with lots of rubber left when I sold the bike! And ask anyone at the flying saucer in Niagara Falls -- I rode my gamma hard.
Cheng Shin (Jeb - Wed Aug 16 06:02:30 2000): Cheng Shin tires are what you might call a 'value' line of tires. The thing is, they're not that much cheaper than a good set of Dunlops (not cheap enough to justify their lack of grip, anyway). I bought a new (used) set of wheels, and one of them came with a Cheng Shin tire still on it. I thought, 'Heck, it still has a few miles left on it,' and so decided to save the $15 cost of a tire swap and wear it down. I soon after decided that the tire is only worth about a K630 in the performance department, if that. Don't skimp and get one of these; spend another $10, and get a good tire.
Bridgestone BT45 (Jeff - Sat Feb 19 00:59:16 2000): The BT45s were new last year and they fit the Ninja (100/90 front, 130/90 rear). Bridgestone markets the tires as geared towards mileage rather than performance. I put a set on and the feedback is greatly improved as compared to the stock tires. I felt much more comfortable leaning the bike over (as far as I dared to) the on BT45s. I took the bike to a track day and I didn't have any problems but the dual compound rear showed more wear than I would have thought but I'm no expert. The mechanic who put on my tires (no, I bought them from another shop) thought they were a good choice for aggressive riding. He said that he would have sold them to me over the Dunlop K591s.
Dunlop K630 (Duke - Thu Sep 21 17:16:27 2000): Many folks have described how terrible the stock K630s are, and admonish everyone else to throw them away and buy 'better' tires. I for one haven't found the reason the 630s are so bad, with exception of wet weather where they do slide around a bit. But for dry riding they are just fine - fully capable of peg-scraping, full-lean turns. Unless of course you are pushing at racing levels, which very few of us are capable of doing (at least I'm not) you will not feel them slide. As far as the predictability of a slide/drift, I've never really experienced much of a slide short of having low tire pressure at the Gap last weekend. And even that front-end 'push' was not severe, just enough to make me think 'was I really sliding?'. Point is, the 630s are fine for all but the best of us. They are also about 35% less expensive than other Dunlop tires.
Dunlop K591 (Paul 311 - Tue Feb 8 23:03:13 2000): On the race track there is no other choice in 16" tires but Dunlop K591's Front 100/90-16 Rear 120/80-16 (front tire) or 130/90-16 There is no other combination of tires presently manufactured for 16" wheels which will work as well as these two tires. They're cheap too. I don't have any sort of tire sponsorship, so I'm not trying to sell anyone Dunlops. Every single Ninja 250 that races with the AFM runs Dunlop K591's (except for a couple people I've seen running stock tires on their very first race weekend)
Dunlop GT501 (Paul 311 - Thu Sep 28 20:31:09 2000): The K591's are now out of major production, though will still be available for a while... the GT501's are their replacement.
Here's a quick second hand review:
Fast guy Robert Kennedy tested out the new Dunlop GT501's at the track last weekend. He thought they felt as good or better than 591's, and they also seemed to wear pretty well. The smallest front is a 110/90-16 which required fender modification (moved it up) to keep it from dragging. The choices for the rear are the same as before 130/90-16 or 120/80-16.
He did comment that the larger front tire made the bike steer more slowly. I think the increased tire size and the pinched profile probably offset each other so the contact patch is about the same (Robert did his best ever lap times on these tires Sunday). He had to lower the front end a little to make the bike turn in more quickly, in order to compensate for the fatter tire. Robert used these tires to just barely beat me, my trick wheels and my trick Dunlop D207GP and GP* tires. Skill wins over technology again.
Kenda (Jeb - Wed Sept 5 10:23:22 2003): The Kenda K657 Challenger and K671 Cruiser tires are both decent quality tires with solid grip, good water dispersion and neutral profile. They are inexpensive (a little over $100 a pair), and come in 100/90 and 130/90 sizes for front and rear, respectively. These tires are heavy, 6-ply units that are best used for touring, in my opinion. They don't match the quality of Metzeler touring tires, but are cost effective with good tread wear, and can handle heavy loads.
Pirelli MT75 (Jeb - Fri Sept 5 10:49:59 2003): If you're looking for an inexpensive, sporty replacement for the stock tires, this is it, IMHO. The Pirelli MT75's are cheap (about $100/pair), offer good treadwear (about the same as stock), excellent grip (not quite as good as GT501's, but still very good), and light weight (less unsprung weight means better suspension response). These tires fit the EX250 rims absolutely spot on (100/80 and 120/80 are what the wheels were designed for), and steering response is awesome with them. High speed straight-line stability will not be quite as good as with a larger 100/90 & 130/90 setup, but turn-in rate and agility will be better.
Pirelli Strada MT68/69 (Ian - Wed May 14 09:39:20 2003): Last summer, I had surpassed 12k miles on the stock Dunlop K630's, and had completely killed the rear treadwise, but the front could have kept going, if I could have stomached it. Unfortunately, working in McD's for 4 years as a manager back in the mid 90's didn't stiffen up my stomach that much. So I did some searching for decent tires at a decent price. The price needed to be the more important factor, with quality being close behind.
I wanted decent tires that would offer good wear, stick, and especially feedback after dealing with the stock rim protectors for so long. I did some searching around, and liked the sound of the Pirelli Strada MT-68/69 series tire, and ordered a set. Unfortunately the place I ordered from couldn't get the front tire anymore, so I just went with the rear, and had them slap on a Bridgestone BT45 front, for $1 more than the Pirelli would have cost. Front tire size is a 100/90-16, and the rear is a 120/90-16. After a little difficulty mounting the tires and getting the beads to seat on the rear tire, I was off on new rubber. First thing I noticed right away after scrubbing the tires in is that the front end of the bike no longer feels like its just there. You can actually get a feeling for what's going on between the front suspension and the ground. Turns at speed became enjoyable, instead of feeling like work. I didn't have to wonder if I'm going to fast for the curve anymore because the tires are actually telling me what's going on down there.
I put lots of miles on them in various different conditions. Rain, slow speed commuting, fast speed commuting, twisty mountain roads, and everything in between. They seem to be pretty decent in all conditions, save snow. I decided to "retire" the Strada after 10k miles of daily use after a mishap with a nail and a plug that failed. It still sits mounted on a rim, fully inflated in the event of an emergency, tons of tread still on it. The BT45 is still going strong at 12k miles, but I'll probably replace before the winter sets in.
Pirelli Sport Demon (Brent - Wed Apr 16 16:28:04 2003): Pirelli has a new tire option for the 250 in a 100/90-16 front and 130/90-16 rear. It's the Sport Demon tire and seems to be marketed as a sporty touring tire. It seems wedged between the MT66 (which they list as a cruiser) and the MT75 (which they list as sport). The MT75 treated me well so I see no reason to why the Sport Demon would not perform well.
etzeler (Daryl - Mon Jan 3 15:55:24 2000): I've gone through two rear and one front Metzeler tires and I like them very well. I'm ordering a set here in a few weeks. Front is a Lazer 100/90-16, Rear ME-55 130/90-16. I get 20,000 miles from the front and 10,000 miles from the rear. Best rain tires I've ever used, with good ride and very good feedback and grip. It raises the bike a little with no tire clearance problems.
Michelin (Jeb - Sun Mar 6 01:35:27 2000): Michelin no longer makes tires that will fit the EX250 rims.
How do I determine tire size?
Duke - Sat Apr 22 09:48:54 2000
130/80-16 means that the tire is 130mm wide and is 80% as tall as it is wide (aspect ratio) and fits a 16" rim. A 130/90-16 is the same width, but is slightly taller, and has a slightly larger diameter. Many folks have switched to the 130/90-16 rear and 100/90-16 front due to better tire selection in those sizes. No one has reported problems using the larger tires. It's unadvisable to change only one of your tires, as it's always recommended they be changed in pairs (however I've seen a couple folks who have mixed tires w/ little problem).
The largest rear tire I've seen is Leon's 140/90-16. However, it rubbed against his swingarm at speed (the tire 'grows' slightly when spinning) and wore a section off the tire; I believe he had to do a little bending of the webbing on his swingarm to make it work. To be honest, when riding around with him, it doesn't really look any different than the stock tire (if looks are what you're after). The racers (like Paul 311) are actually using a 120/80-16 rear tire, as it said to perform better than the 130 size.
To be honest the K630 tires (stock/OEM) are fine for all but the most aggressive riders and the racers. I've ridden mine fairly hard with no problems at all. The only place they've wandered was riding Deal's Gap in the rain, but that's to be expected.
Do taller/wider tires work better than the stock sizes?
Jeb - Wed May 2 23:03:47 2001
The stock tire sizes are pretty good. It's getting harder to find 100/80 and 130/80 tires, though, so it's good to know what the other options are.
Taller tires alter your steering geometry; this can be good or bad depending on which tire you change. A taller rear tire will steepen (decrease) the geometry, making the bike turn faster; a taller front will increase the steering angle. Increasing both front and rear tire heights can be good, because you get an even steering angle (close to stock), and get added road clearance and trail length (provides stability). A taller rear tire will also increase the final drive gearing a bit (lowering cruising revs), while a taller front will increase speedometer accuracy.
Wider tires generally slow the steering of the bike down. They also alter the contact patch, as the tire is 'pinched' in the rim. Wider tires can provide better straight (non-leaning) traction. Wider tires are necessary when carrying heavy loads or if the bike makes a lot of power; the EX250 typically does neither of these things, so wider tires are usually of no benefit.
Taller and wider tires both weigh more, so you have additional unsprung weight to deal with (slows down suspension action). Considering all of these points, I use a 90 profile front tire on my bike, with a 120/80 tire on the back, and suspension setup that offsets these changes (lower front suspension, higher rear). This provides the best performance and handling, in my opinion.